
Points of interest, areas
The system manages the personal areas in groups. Each group can contain an unlimited number of areas. When defining an area, the system takes the area covered by the shape into account, or a radius of 250 meters for points. This means that when the vehicle stops in the range of the specified area/point, the name specified by you will appear rather than the address.
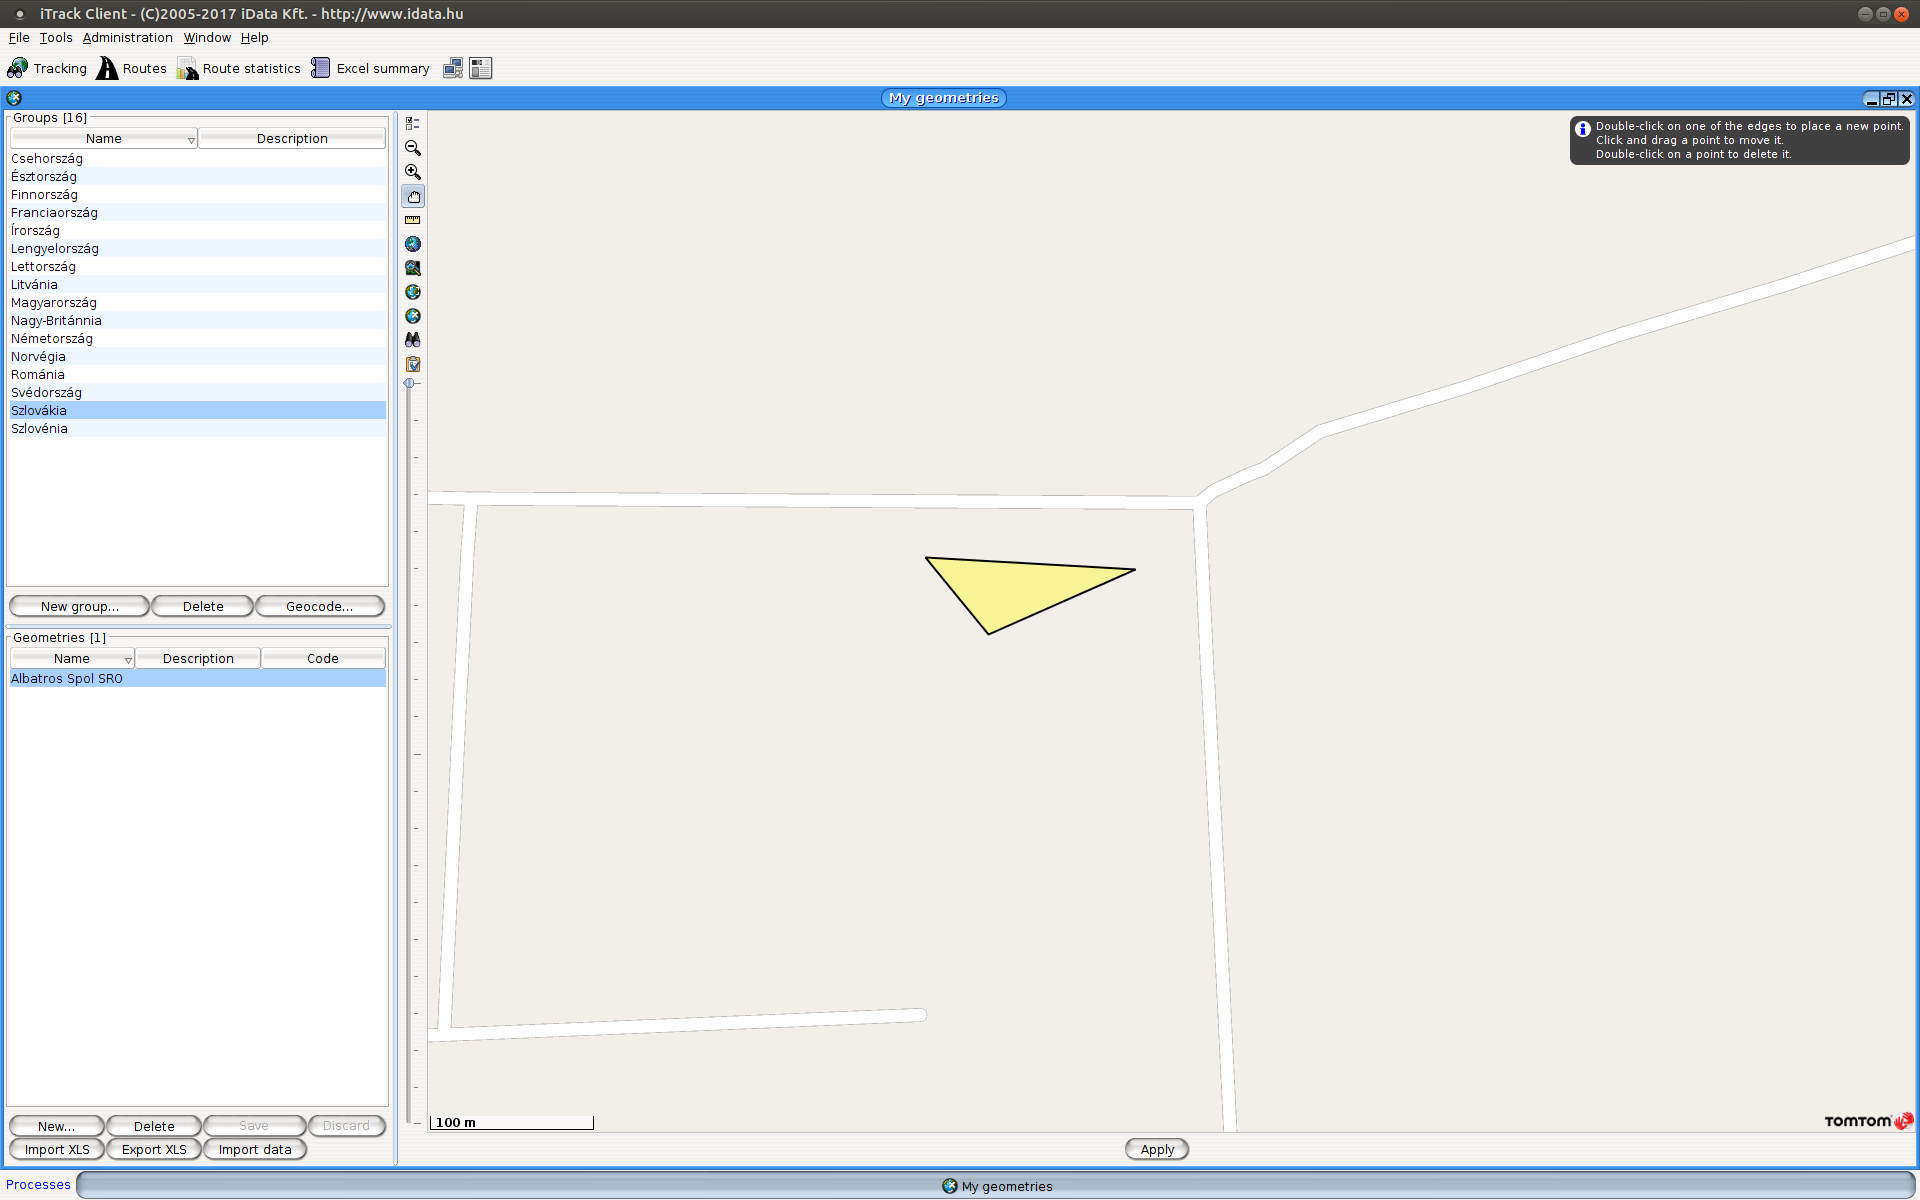
The editor can be divided into two parts; the group and area navigator is located to the left, and the map can be seen to the right, where you can edit the areas.
Groups can be found at the top in the navigator. You can add a new group with the New Group button, and you can delete the selected group with the Delete Group button. A group can only be deleted when all the areas have been removed from it.
When you select a group, the areas in the group are displayed in the bottom list. When you select an area, it is displayed on the map where you can edit it immediately.
After you have selected a group, you can manually create a new point or area with the New... button. Enter the point name first, then click OK. Then look for the specified location on the map and you can edit the area and add more points by clicking and dragging your mouse. When you move the mouse over the point you want to edit, the point is automatically selected. If you want to move it, just press the left mouse button and drag it to the right place. Use double-click to delete.
To add a new point, move the cursor to an edge (side of a shape) and it will be selected and you can add a new point on the edge by double-click. If less than 3 points are recorded, you can add a new point anywhere by double-click.
You can simply add new points on the map as well. Click with the right mouse button at the location of the point you want to record and you can add it to a group. To do so, select Add POI... from the pop-up menu, then select the Group from the drop-down list in which you want to add a point. Then enter the point name and then press OK to save it.
You can add a point also based on the route list. Click on a route with the right mouse button and select if you want to add a starting or end point to a group. Further steps for adding the point are identical with the method already described at the Map.
To display the name of points entered in the Routes, the points need to be geocoded after data entry is complete. After pressing the Geocode button, a window opens where the list of vehicles belonging to the user appears in the rows on the right side, and the groups entered can be seen in the columns.
Place an X in the box next to the registration number (you can choose more than one or all registration numbers) you want to activate for the groups entered.
Bulk entry of points
In some areas it is more comfortable to enter the points one by one, but if you have the addresses of hundreds of partners to be entered, that would normally require tedious work for many days. The iTrack system supports and helps the bulk entry of points with its computer background, so that the work that would last for days or weeks can be reduced to a few hours.
You have to give the name and address for each point, and the system will search for the points corresponding to these addresses on the available map. If there are more than one such points, for example the address is inaccurate, then the user can select from the list of possible points. The system will show them on the map so that you can find the correct point. If necessary, a point can also be moved on the map in the manner previously described.
When you have selected the correct point, click on the Accept button, and the system inserts the new point under the selected group, and moves to the next row in the list.
You can save accepted points with the Save button under the group.
Points can be imported into the system in an Excel table. The table can contain rows with the following format:
- Column A: must be “POI”. The system will ignore any other rows.
- Column B: empty.
- Column C: the name of the point. It must be unique (e.g. Stationery shop)
- Column D: the name of the town
- Column E: the name of the public area (e.g. Kossuth Lajos), or its number, eventually
- Column F: house number (in case of 13 Kossuth Lajos Street, it is 13)
- Column G: ZIP code for the point (if known)
- Column H: note (irrelevant)
- Column I: direct latitude (e.g. 47.5341 v. -21.4452)
- Column I: direct longitude (e.g. 19.2234 v. -44.2234)
If direct coordinates are specified correctly, the system will not search by title, but it will store the point with these coordinates.
It is possible to enter public areas and the house number in the usual way, for example 13 Kossuth Lajos Street, and the will program analyze the address and separate the name and the number of the public area. If, however, the exact house numbers and public land data are available, it is better to enter the data in separate fields for the sake of accurate search results.
For the bulk entry of points, select the group that you want to fill with data and then press the Import XLS button and locate the Excel file.
It is also possible to export points/areas already recorded from the system. After selecting the group you want to export, press the Export XLS button and save the file to the location that you specify. The exported XLS file has the same format as above, in order to ensure the interoperability of the import/export files. If some areas outside the points are also included in the group, our system will convert these shapes to points during the export (the point will be the center of the shape).
(C) Copyright iData Kft., 2005-2022. All rights reserved.
